XRT ENGINEERED
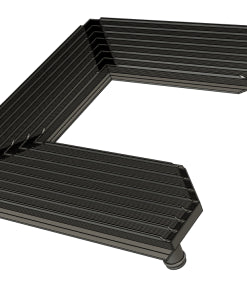
XRT SNOWBIKE TUNNEL COOLERS
XRT SNOWBIKE TUNNEL COOLERS
Couldn't load pickup availability
NOTE-COOLERS ARE BUILT TO ORDER SO THERE WILL BE A BIT OF LEAD TIME.
Fits all Timbersled ARO, Riot, and Mountain Horse models.
Fits all 3″ track models and all ARO Gen 2 models
Fits all Mtn. Top models
Fits all RALE models
(Have an older model and need a custom heat exchanger? Contact us for a custom size.)
NOTE: To make this system work at its best, you need a coolant bottle with a pressure cap.
Having issues with engine temp control on your prized snowbike build? Here is your solution to fix the biggest factor in maintaining engine temps on the trail, in deep woods, or steepest hill climbs from the coldest days of winter to the warmest days of spring! And best of all- engines produce the most HP at optimal engine temperature, and us snowbikers know every little bit of power count.
3 sizes available- in wide or narrow models:
- Compact lightweight: The bare minimum you need for keeping your 450 engine cool with deleted radiators. Plenty enough cooling if you ride only ideal snow conditions. May not be enough cooling if riding hard crusted flat meadows or glaciers and the track is not breaking through the crust and digging/ throwing snow. If you decide to keep one radiator, this will be plenty enough supplemental cooling on any 450, BRC500 or other 2 or 4 stroke big bores.
- Midsize: Plenty enough cooling with both radiators removed on all 450 bikes, 2 or 4 stroke, and any big bores up to 700cc.
- Big Boy: Massive cooling for the 2 stroke big bores and BRC500 crowd with deleted radiators who just want the extra cooling capacity for peace of mind.
Before you decide what size you want
Wide vs Narrow Heat Exchanger
Have other accessories mounted to your tunnel panel with bolts going through to the underside? Don't want to move it to accommodate a heat exchanger? Not a problem! The narrow model is only 7.65″ wide, much narrower than your gas can, toolbox, etc. and will leave you with almost 2″ of space on each side for your tunnel top mounted accessories hardware.

Most gas cans & tool boxes mount with hardware in the 4 corners and would clear the heat exchanger, but If your tunnel top accessory has a bracket that needs to be mounted in the middle like this ↓ and would interfere with with heat exchanger, it can be mounted on a 1/8″ thick aluminum strip to divert the “through middle of tunnel panel bolts” to the sides. We also have a universal gas can bracket kit made just for this: Universal Gas Can Mounting Kit $40

Configuring your setup/order:
- Pick your heat exchanger length and width configuration. We have customer feedback with cooling results on our Instagram page to give you an idea of what to expect.
-
Add in rivets, etc.
- An order of rivets will include more than enough rivets for installing your ordered heat exchanger size with 2″ rivet spacing.
- Timbersled bumper rivets are for newer models which require the bumper rivets to be removed to be able to remove tunnel panel from skid. See pics in photo gallery.
- Configure your coolant bottle setup: Snowbike Coolant bottle 2.0 Bar
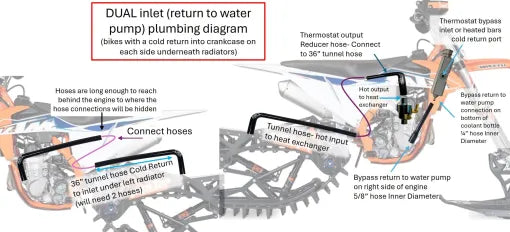
Don't forget your hoses: Heat exchanger conversion hoses
Install: Please see plumbing/ hose routing diagram in the picture gallery!
- Use only worm gear or screw style clamps. Do not use spring clamps – they will not hold up to the pressure. Make sure clamp is installed below the hose bead and not on the bead itself.
- Use our custom hoses for the cleanest looking and easiest plumbing setup: Heat Exchanger Conversion Hoses.
- Our custom silicone hoses can touch engine & cylinder head! But cannot touch any exhaust components!
- You can also use auto parts store hoses and hardware store fittings to get the plumbing where you want it with the bends and angles you want.
- Cooler is 1/2″ thick. Check to be sure the track is not going to be touching the heat exchanger and there is at least 3/16″ clearance between track and heat exchanger at the tightest point. Move the heat exchanger back a little if needed.
- If your worried how close the heat exchanger will be to the track lugs, take a look at the last pic in photo gallery.
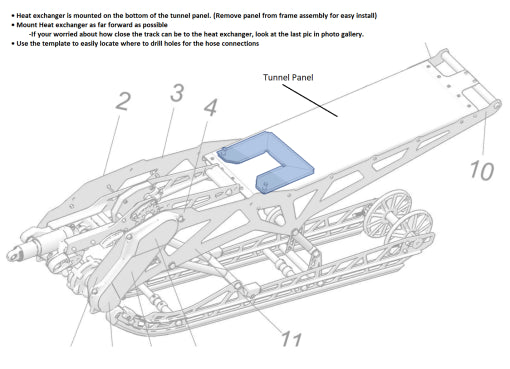
- Remove tunnel panel from frame assembly, position template (available in gallery) and locate centers where to drill holes for hose adapters.
- NOTE: if you are using the narrow model in order to accommodate a gas can mounted on top, the gas can may need to be offset to the side so it clears the exhaust. Confirm positioning of your gas can first, then proceed with positioning the heat exchanger.
- Using the template for your style of heat exchanger (available in picture gallery) Mark and drill out 3/4″ holes. Test fit and widen holes as needed. Increase hole size to 7/8 to accommodate some of the weld bead. (Using a step drill makes this so much easier!) Mount heat exchanger and re-install panel.
- Push the 90° hose elbows as far down as possible to the weld bead base, it will cover up almost the entire hole.
- Trim the hose leg as needed so it is just high enough to clear whatever frame supports are there and send it forward to the engine.
- Heat exchanger to tunnel top panel mounting options: rivets, small countersunk or pan head bolts to keep the tunnel top as smooth as possible with nothing bulging out.
- Rivets are easiest and fastest. Recommended rivet size: 3/32″ – 1/8″ Dont go bigger than 1/8″ its unnecessary and wont look as clean.
- Recommended spacing for rivets/screws to mount heat exchanger to tunnel panel: 3/32″ rivets every 2 inches
- Run your hoses. MAKE SURE to secure hoses with plenty of zip ties so they do not bounce and contact the track!!
- Make sure you do not have any hoses that are hanging low enough to get rubbed by the track! Hoses must be at least 1/4″ above the bottom of the frame rails.
- After install follow the Filling and bleeding the system instructions found here: Heat Exchangers: Filling and bleeding system
NOTE: same as it is on a snowmobile- if the trail is frozen and your track is not throwing snow on the heat exchanger, your engine will begin to overheat and you will also be damaging your track and hyfax as its not getting lubricated. You must be either hitting the ditch/ banks with soft powder or have an ice scratcher to provide lubrication for your track and cooling the engine.
Tip: install ice scratchers on both sides, but use only one at a time and it provides enough snow onto the track for cooling. Riders forget to put up the ice scratchers when off the trail, and they break, but at least that way you will have a spare on the other side.


